Wondershare YouTube downloader for Mac is both a Mac YouTube downloader and a Mac YouTube video converter. It can help you download the YouTube videos you like to your computer for free and put them on iPod, Phone, PSP, PS3, Apple TV, Creative Zen, and iRiver and so on.
Step1. Launch Program
Open Wondershare YouTube Downloader for Mac. When you are asked if you want to turn the Sniffer on, click Yes to turn it on.

If this is the first time that you launch the program, you will see a pop-up window asking you to input the password of your Mac login account. This is very important for the program's Sniffer function. You follow the steps specified on the pop-up window below:

Step2. Download YouTube Videos
Go to YouTube website and open the pages of the videos you want to download. The program will detect the URL and automatically start downloading a video when it starts to play. From the source list, you can find the status of each file. See the figure below:
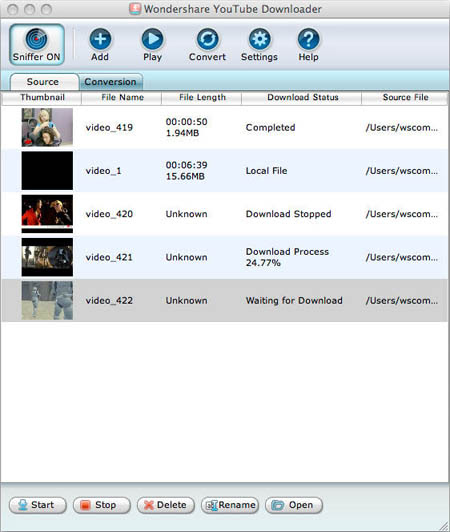
If you want to find the downloaded files, you can click the Open button to go to the directory where the downloaded files are saved.
Step3. Convert YouTube Videos
If you want to convert any of the completed files, you can select them and click the Convert button. Then you will see the window below:

Select the output format from the "Format Preset" drop-down list for the selected files, click the Browse button to specify a location to save the converted files, and click OK to start conversion.
The conversion status of each file can be found under the "Conversion" tab, see the figure below:

If you want to find the converted files, you can click the Open button to go to the directory where the downloaded files are saved.
After the conversion, you can just put the converted files to your iPod, iPhone, PSP, Apple TV or PS3 etc. and enjoy your favorite YouTube videos on the move!
This page will show you how to burn Mpeg DivX XviD WMV ASF MP4 AVI to DVD on Mac step by step with DVD Creator for Mac.
DVD Creator for Mac provides easy and fast ways to convert AVI to DVD, MPEG to DVD, DivX to DVD, burn DVD folder to DVD, DVD ISO file to DVD for Mac! The Mac DVD burner can convert popular video formats such as MPEG, DivX, WMV, XviD, DV, VOB, AVI to DVD and burn DVD movie to be played on portable or home DVD players.
Step1. Please download DVD Creator for Mac and run it on your Apple computer.
Step2. Run the DVD Creator for Mac and add registration code in the "Help" button. Now, you can convert your DVD at any time.

Step3. Add files that you want to convert. Here are two ways. One is to click "+" in the main interface, the other is to click "Add Video Files" option in the File menu. It can create DVD from AVI, MPEG, WMV, ASF, DV, DivX, XviD, VOB, 3GP, 3G2, MP4, NUT, YUV, H.264, M4V files.

Tips:
1. You can also add ISO files or DVD folder under "Action" menu.
2. There are three Resize Methods you can pick, "letterbox", "Pan and Scan" and "Full Screen".
3. More optional preferences you can set under "DVD Creator" menu, such as choosing the video format, quality and so on.
Step4. Set Menu topic, background music and picture by clicking "Edit" button on the right of the main interface.

Step5. You can preview your DVD now before creating DVD. It's awesome, right?

Step6. Click destination to choose the output file you want. The default method is to make a DVD Disc, but you can also save your videos as ISO file or DVD folder.

Step7. Burn your DVD at once. Just click the round circle button on the main interface.

Tips: In this case, Detailed process and Total process will be shown on your Mac, don’t worry about it, the software is busy converting now, wait a moment to see your great job.
This page will show you how to convert MPEG WMV VOB MP4 AVI to iPhone Movies on Mac step by step with iPhone Video Converter for Mac.
iPhone Video Converter for Mac, a faultless iPhone video converter, can convert all popular audio and video files, such as AVI, MPEG, WMV, MP4, VOB, AAC, AC3, MP3, to the formats supported by iPhone/ iPod including MP4, M4A, MP3 etc.
Step1. Please download iPhone Video Converter for Mac and run it on your Apple computer.
Step2. Load files you'd like to convert. Add the video or audio files you'd like to convert by clicking "Add" button in the main interface.

Step3. Set output profile
Choose a format you want to set in the 'Profile' combobox.
Tips: Besides the "Profile" provided by the software, you can also customize your own "Profile" according to your needs.
After selecting the files you wish to convert, select "Profile" , then modify the parameters of video and audio bit rate, video size etc under the "General" and "Advanced" tabs.
Step4. Preview source files
iPhone Video Converter supports a preview window on the right bottom of the main interface to view the selected file.
Select the file you want to view in the program list and click "Play" button to play it. You can also use the "Previous", "Pause", "Stop" and "Next" buttons to control the playback.
Tips: This function is only for previewing the source file.

Step5. Convert
Then click the "Encode" button to start the conversion. All the selected files will be converted one after another.
Tips:
1). The software supports mullti-threading and batch conversion so that you can convert several files at one time.
2). Select "Tools>Preferences" to open the Preferences tab. In the General tab, you can set the Maximum simultaneous processes and Maximum simultaneous running processes. After the setting, please click "Apply" to activate your setting, while click "OK" to close "Preferences" tab. Your setting will be effective in the following conversion.

Step6. View the result
After the conversion, click "Open" button at the bottom of the main interface to browse the output files.
Tips: If the output file is iPhone format, just click the "Open" button and copy or drag the desired converted files to your iTunes.
Flash Decompiler Trillix for Mac can convert Adobe Flash SWF files back into FLA format which can easily be edited in native Flash environment. Every group of objects such as morphs, shapes, texts, fonts, motions, sounds, ActionScripts, etc. could be placed in separate FLA library groups, which makes using and working with the resulting FLA file much easier.
Here's the step-by-step guide about how to xtract SWF objects (morphs, shapes, motions, etc.) with Flash Decompiler Trillix for Mac on Mac. This guide assumes that you have already installed Flash Decompiler Trillix and it is opened.
Step1. Select SWF file
Once you have launched Flash Decompiler Trillix you must specify the SWF file you would like to convert. You can do it either by clicking button next to "SWF file name" or by selecting "File" -> "Open" from Main Menu.

This will invoke "Open file" dialog where you can navigate to your file:

Step2. Define the destination folder where all the necessary objects will be extracted to

You may specify destination folder by clicking button that corresponds to "Destination" field. The destination folder, by default, would be created in the same place where the original SWF file is located and its name would be equal to SWF file, without the "swf" extension.
Step3. Customize which objects should be extracted and their desired file types
By default Flash Decompiler selects all objects to be extracted mostly into flash animation (SWF) file format. Please, note that you need to switch to Advanced mode if you are going to select objects and file types manually. You may consult Switching simple and advanced modes section to see how to switch modes.

Flash Decompiler Trillix allows you to extract images, sounds, video, shapes, morphs, fonts, texts, buttons, sprites, frames and scripts into various file formats. All the objects can be extracted separately into flash animation (SWF) and flash sources (FLA) file formats, except for scripts which can be saved to AS and TXT file formats. Let's review the list of possible objects and file formats, except mentioned above: - Images can be extracted into JPG, PNG or BMP file formats
- Sounds - WAV or MP3
- Video - AVI, MPEG1 and FLV
- Texts - TXT, HTML, RTF
Step4. Press "Extract objects" button to start the extraction process

Note: demo version of Flash Decompiler Trillix extracts only two first objects from every SWF category. In other words, for example SWF file consists of 7 pictures, 5 sounds, 6 frames, etc, demo version of Flash Decompiler will extract only first 2 pictures, 2 sounds, 2 frames, etc.
Step5. You may observe extraction log entries in "Extraction log" window (in Advanced mode only) to determine if any problems occurred.
For your convenience these log messages can be saved in a log file that could be sent to our support team to help us resolve a problem if any occurs. To save extraction log you need to open "File", select "Save conversion/extraction log" right after the conversion is finished before you click "Done" button.
This page will show you how to create a virtual machine for Mac step by step with Parallels Desktop for Mac.
Parallels Desktop for Mac is a powerful and easy-to-use virtualization software for Intel®-based Macs and is designed to work with a wide range of operation systems. Parallels Desktop for Mac enables you to run Windows, Linux, and more side-by-side with Mac OS X on any Intel-powered Mac, without rebooting. With Parallels’ award-winning virtualization technology, you can run Mac OS X and your favorite Windows applications at the same time. You can even drag-and-drop files between desktops!
Note: You need a complete, fully licensed copy of Windows XP or Windows Vista. You may use an installation CD or an ISO image of the installation CD.
Step1. Please download Parallels Desktop for Mac and run it on your Apple computer.
Step2. Parallels Desktop for Mac main window appears. Parallels Desktop for Mac is browsing files on your computer for existing virtual machines. If Parallels Desktop for Mac cannot locate any virtual machine on your Macintosh computer, the Welcome window of OS Installation Assistant appears. If Parallels Desktop for Mac locates a virtual machine on your computer, the list of virtual machines appears in the Select virtual machine dialog so that you can select and open any of them.
To create a new virtual machine, click the New button, or choose New from the File menu, and you will see the Welcome window of OS Installation Assistant.

Step3. In the Welcome window, select the Windows Express option and click Next.

Step4. Select the Windows operating system to be installed and click Next.

Step5. Enter the Product Key for your copy of Windows and your Name. You can also enter the name of your Organization. Click Next.

Step6. Specify a name for the virtual machine as you want it to appear in the list of available virtual machines on the Select virtual machine dialog. By default, the virtual machine is named by the guest operating system. Click More Options, if you want to choose other than the default location for the virtual machine.

Step7. Choose the preferable way of allocating the computer resources: to the virtual machine or to Mac OS X.

Step8. If you want to use an installation CD, insert the disc into the CD/DVD-ROM drive of your computer. If you want to use an ISO image of the installation disc: - Click More Options and select the ISO image option.
- The Choose button becomes enabled. Click it to locate the ISO image file.
Make sure that the Start Windows XP Installation check box is selected and click Finish.

Step9. The OS Installation Assistant creates the virtual machine and installs Windows XP or Windows Vista operating system in it. This process takes approximately one hour.
Note: During the guest OS installation, the input of keyboard and mouse is captured inside the virtual machine. To release the keyboard and mouse input for Mac OS X press Control+Alt or Control+Option(Alt). To capture the input again in the virtual machine, click inside the virtual machine window (guest OS window).
Step10. After installing the Windows operating system, OS Installation Assistant installs Parallels Tools in the newly created virtual machine. You need to confirm Parallels Tools installation, when prompted. During Parallels Tools installation you need to confirm the installation of so-called unsigned drivers. Always choose Install this driver software anyway.

Step11. When the installation is complete, either eject the installation disc or disconnect the ISO image of the installation disc. See below for details.
Step12. To protect your new virtual machine, from the Actions menu choose Install Kaspersky Internet Security. This feature is available for both Windows XP and Windows Vista.
Step13. During the Express Installation, Parallels Desktop creates an administrator account with a blank password. To learn how to change the administrator password, open the Help menu and choose Parallels Desktop Help -> Creating a Virtual Machine -> OS Installation Assistant -> Windows Express Installation. - Ejecting CD/DVD Disc
* Press the Eject key on your keyboard (a triangle with a line underneath). If you are using a keyboard that does not have an Eject key, drag the CD/DVD disc icon to the Trash to eject the disc.
* In Windows, open the My Computer folder, right-click (Control-click) the CD/DVD disc icon, and choose Eject from the shortcut menu. - Disconnecting ISO Image
Right-click the CD/DVD-ROM icon located at the bottom of the Parallels Desktop window, and select Disconnect in the menu.
This page will show you how to convert iTunes DRM protected music to MP3 AAC AIFF WAV on Mac step by step with DRM converter for mac.
DRM Converter for Mac is the legal way to convert iTunes DRM protected files to unprotected music files. It is a DRM copy-protected audio and music converter designed for burning DRM protected music to a special virtual CD-RW drive where you can easily get unprotected MP3, AAC, Apple Lossless, AIFF, WAV files ready for use on any player. DRM Converter for Macr uses a CD-RW and iTunes itself to convert all of your DRM music files to standard format files (MP3, AAC, Apple Lossless, AIFF, WAV) that you can use with iPod player. With DRM Converter for Mac you can create MP3, AAC, Apple Lossles, AIFF, or WAV files from your DRM files.
Step1. Drag DRM Converter for Mac from the Disk Image or CD to your Applications folder
Step2. Open your Applications folder
Step3. Double click DRM Converter for Mac
Step4. If needed enter the word for Protected in your local language in DRM Converter for Mac in the field titled: Identify protected tracks by looking for this word in Kind:
Step5. If you want to convert a specific playlist instead of your entire library then pick the playlist from the pop up menu titled: In this playlist:
Step6. Optionally, if you want to convert to a format other than MP3 (the default) then pick the format from the pop-up menu to the left of the Dump DRM button
Step7. Click the Convert DRM DRM button.
Note:When you click the Convert DRM button, DRM Converter for Mac will ask you to insert a CDRW. DRM Converter for Mac will then find all the protected tracks and start burning them in groups of 10-20 to the CDRW and ripping them back to your selected, unprotected format. All your unprotected tracks will be placed in a new playlist called something like MP3 from DRM Converter for Mac (the MP3 will change if you picked another unprotected format) and your original tracks will be left untouched. Its going to take some time so you should have something else to do, not on your computer, and just check on DRM Converter for Mac now and then to make sure things are still happening.
System Requirements: - Mac OS X 10.3 or later
- A scriptable version of iTunes (DRM Converter for Mac was tested using iTunes 7)
- GUI Scripting enabled in the Universal Access System Preference
- A CD-RW disk and CD Burner.
This page will show you how to convert/rip DVD to MPEG MOV AVI MP4 WMV Blackberry etc. on Mac step by step with Xilisoft DVD Ripper for Mac.
Xilisoft DVD Ripper for Mac is powerful, all-in-one DVD Ripper designed for Mac users specially. As DVD Riper, it can rip DVD to video formats like AVI, MPEG, WMV, DivX, RM, MOV, 3GP, 3GP2, MP4, MPEG4 AVC, BlackBerry 3GP, BlackBerry AVI, BlackBerry MPEG-4 Video(*.mp4), etc. As DVD Audio Ripper, it can rip DVD to audio formats like MP3, WAV, WMA, AAC, AC3, M4A, OGG, RA, AU, BlackBerry AMR Audio etc.
Step1. Please download Xilisoft DVD Ripper for Mac and run it on your Apple computer.
Step2. Load DVD
Insert DVD to your DVD-ROM. Start up DVD Ripper for Mac loading DVD automatically.

Or you can click “Add” button to load DVD disc.

Step3. Set the output format
After loading the DVD, please highlight the titles or chapters you want to set, and then select the profile from the “Profile” pop-up menu on the right “General” panel.

Tip: After setting the profile for the selected files, you can adjust parameters by the “Advance” panel.
Step4. Set the output file destination
Click the “Browse” button to choose the path where you want to save the output files in.

Step5. Preview source file
Select the file you want to view and click the “Play” button in the preview window right below. You can “Pause”, “Stop” when the movie is playing.

Tip: This function is only for previewing the source file.
Step6. Start converting
After everything is OK, please click the "Convert?button to start ripping.

Tip: After setting the profile for the selected files, you can adjust parameters by the “Advance” panel.
Step7. View the conversion result
After the conversion is done, click the “Open” button at the bottom of the main interface to browse the output files.
